Showing posts with label Windows 7. Show all posts

View full File & Folder address path on Windows 7

By default, address bar on Windows 7 operating system does not show complete address path URL of files and folders. However, at times we need to know full address path URL of specific file or folder. You can easily view, copy and save complete file or folder address path URL using quick procedure as explained below.

File address path on Windows 7: View & Copy

1. Press and hold Shift key and then right click on specific file.
2. Then click ‘Copy as Path’ option.
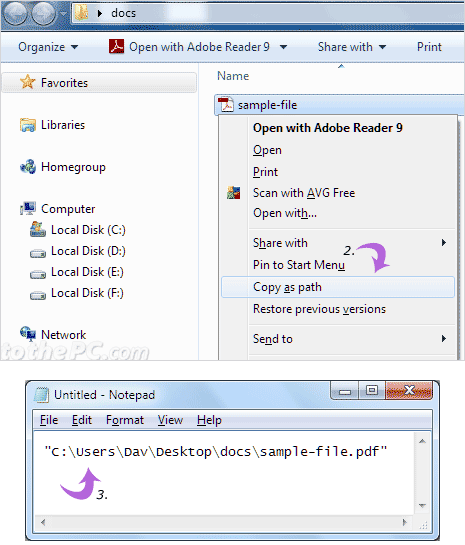
3. Open Notepad and press Ctrl + V paste and view the complete path of the file. Alternatively, you can goto Edit > Paste to paste and view complete address path.

Folder address path on Windows 7: View & Copy

ADDRESS PATH WITHOUT OPENING FOLDER
1. Hold down Shift key and then right click on the folder.
2. Then click ‘Copy as Path’ option.
3. Open Notepad and press Ctrl + V keys to paste & view complete folder path.
COPY ADDRESS PATH FROM FOLDER WINDOW
1. Double click to open specific folder.
2. Right click on address bar and then click ‘Copy address as text’.
3. Open Notepad and press Ctrl + V keys to paste full folder path.
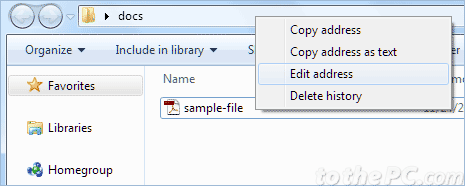
VIEW ADDRESS PATH IN FOLDER WINDOW
1. Double click to open specific folder.
2. Then right click on address bar and click ‘Edit Address’ option.

Disable Windows 7 scan and fix removable disk notification


scan and fix removable diskWindows 7 has a feature that helps you to scan and fix the removable disks when they are inserted. This feature is a helpful one if your pendrive is having some trouble otherwise in my opinion its one of those irritating features of Windows 7.
This usually happens if the device was not properly disconnected from the system in a previous session. It is more of a “we assume there is a problem because last time..” than a de facto problem. I am sure that most of the Windows 7 users are aware of this feature. If you feel this feature irritating then here is the fix for you.

This feature is provided by a service called “Shell Hardware Detection” in Windows 7. To disable this scan fix feature you have to just disable the above service. To disable Shell Hardware Detection do the following: Press Windows-R, type services.msc and hit enter. This opens the Services configuration window. Locate the service Shell Hardware Detection and double-click it. Click on he startup type pulldown menu and change it from automatic to disabled.
This disables the service so that it does not autostart with Windows anymore. Thus your problem is fixed.
Share and Enjoy:

How To Edit Windows 7 Boot Menu


If you’ve ever used a dual-boot system and then removed one of the operating systems, it can still show up in Windows 7’s boot menu. We’ll show you how to get rid of old entries and speed up the boot process.
Older versions like xp editing the boot menu was an easier task compared to Windows 7. There are so many ways you can edit the boot menu of Windows 7, yet I am gonna tell you three main ways to do the task…
USING COMMAND PROMPT
We will use an application called bcdedit which is the built in application for Windows 7 boot menu edit. You should always try to use the built in applications rather using a third party one..

Type bcdedit and press enter to show the current boot menu of 7, select the identifier which you want to delete and copy it from the command prompt. After that use the following command to delete the boot menu that you have decided
bcdedit /delete <identifier>
Boot TabUSING MSCONFIG
Type msconfig in the start menu and press enter to open System Configuration Utility and select the tab Boot. From there delete the unwanted option that you need to delete.. Tick the option mark all changes permanent and press apply to save the changes to the boot menu and restart the system.
boot edit easy bcdTHIRD PARTY APPLICATIONS
There are many out there and I would prefer you to use EasyBCD application from NeoSmart Technologies. This tiny application is free of cost and easy to use with a smart user friendly interface. Go to the edit boot menu tab and delete the unwanted option and apply to save the changes.

Download Harry Potter 7 Free Theme for Windows 7

All you Harry Potter fans, rejoice! Harry Potter 7 (also known as Harry Potter and the Deathly Hallows) is to be released in two parts, with the first part releasing in few days from now. It has already got some rave reviews and if you are a Harry Potter fan and a Windows 7 user, go ahead and check out this cool Harry Potter 7 theme.

“Harry Potter 7″ – Free Windows 7 theme

This theme consists of nine Harry Potter wallpapers, have a look at some of them.
harry-potter-7
free-harry-potter-7
Good enough theme to try out for few days, isn’t it?


-----------------------------------------------------------------------------------------------------------------------------------
........................................................................................................................................................................................................................................................................................................................................-----------------------------------------------------------------------------------------------------------------------------------

Download Windows Live Essentials 2011 [Offline Installer]


We will review the Windows Live Essentials 2011 soon, but you can go ahead and download the stable version right now from their website.
The Offline installer is around 155 MB in size and includes all the programs, you can chose which needs to be installed while running the installer.

Minimize Skype to system tray in Windows 7 issue – solution


SkypeSolution to Minimize Skype to System Tray inWindows 7. I have upgraded my operating system to Windows 7 and installed Skype Version 4.2 (Beta) to call and chat with my friends. In Previous OS when i was Minimizing or Closing the Skype it was minimized to the System tray, but this time I found it was not working as the way I expected.
Prior to 4.2 Beta, Skype would minimize to the task bar notification area when you clicked on the close button. It would sit as a hidden icon in the notification area, now you cannot close the window without ending Skype. If you are a Windows 7 + Skype Version 4.2 (Beta) user then you might came across similar kind of issue of Skype Minimize to System tray problem. The latest Skype version, Skype 4.2 (Beta) doesn’t minimize to the system tray.
Follow these steps to Minimize Skype to System Tray in Windows 7
Step 1. First close Skype by right-clicking on the System tray icon of Skype and selecting Quit (It is in the notification area, beside the clock).
Step 2. Open the folder “C:Program FilesSkype” (This is the installation directory of Skype and may differ on your computer).
Step 3. Now open the folder named “Phone”.
Step 4. There you can find the executable file of Skype named “Skype.exe”, right-click on it and select Properties.
Step 5. Then switch to the tab, Compatibility.
Step 6. There tick the check box, Run this program in compatibility mode for: and select Windows Vista (Service Pack 2)!
Step 7. Then click on OK to finish.
Step 8. Now start Skype 4.2 (Beta) from the start menu and it should minimize to the system tray perfectly.
Hope that works for you :)

How to install Windows 7 from USB drive


install-windows-7-from-usb-flash-driveWe have already published an article regarding running Windows 7 from a pen drive using Virtual Box. That guide is useful if you want to make yourself free from need of dual boot. Now here is another scenario what if you don’t have DVD-ROM and you are runningWindows XP. Here is small guide on how to install windows 7 from USB flash drive or USB pen Drive for Windows XP users.
The requirements for this purpose are as follows:
  • Pen drive with a size of at least 4 GB
  • Windows 7 ISO image
  • Any image mounting application like UltraISO
How To:
  • Download and Extract MBRwiz, a free utility to make bootable USB drive.
  • Connect your USB Flash Drive to your computer and Format the USB drive.
  • Now go to Start Menu->run->cmd (Open Command Prompt) and Type following command :- convert i: /fs:ntfs (Where “I” is your USB drive latter)
  • Mount Windows 7 iso as drive using your image mounting application.
  • Open the command prompt and navigate to the directory where you have extracted MBRwiz software and run the following commands.
mbrwiz /list (note down disk number of your USB Pen drive)
mbrwiz /disk=X /active=X (X is Disk Number of your USB Drive)
exit
  • Now open another command window and type following command
J: (Drive letter of Windows 7 iso mounted with image mounting tool)
CD boot
bootsect /nt60 Y: (Y is drive latter of your USB drive )
  • Now copy all files from drive where you have mount Windows 7 iso to the USB drive.
  • Now you are ready to go for the installation.


unetbootinmainwindows7Another method existing is using UNetbootin, a tool for creating bootable pen drive  any operating system out there. This is the easiest way and you will have it done with two clicks.
Insert the USB drive, run UNetbootin, and select Disk Image as ISO. Browse your local drive for Windows 7 ISO that you downloaded and click Open. Now Select Type as USB and choose the drive. Once done, it will look like a bit similar to the screenshot shown here. Click OK and it will begin extracting all installation files to the USB drive. The whole process will take some time(10-15 minutes), so have patience.
Note: If UNetbootin doesn’t work, try out the Microsoft’s official tool called Windows 7 USB/DVD Tool.
Share and Enjoy:

Download Windows 8 Transformation Pack ( THEME )

Earlier I have introduced the Windows 7 Transformation pack along with several other Transformation packs. But this time I am introducing Windows 8 Transformation pack. As you all know Windows 8 OS has not been created yet, but a DeviantART user Mufflerexoz has created Windows 8 Transformation pack on its own imagination.
Windows 8 Transformation Pack will provides lots of new features along with a newly designed interface. It looks very similar to Windows Vista and Windows 7 but there are many GUI changes like redesigned taskbar, Explorer, new boot screen and login screen, etc. Below I am adding some screenshots of Windows 8 Transformation pack, take a look:
windows 8 superbar 300x187 Download Windows 8 Transformation Pack
You can use Windows 8 Transformation Pack on Windows Vista. Download windows 8 transformation pack from following link:

Download Windows 7 Genuine Patch PlusPatch V6 & Activate Windows 7 beta 1

Genuine Windows 7 Beta 1 Logo


Recently we had posted about Windows 7 Activation Patch PlusPatch V5 which is first Windows 7 beta 1 genuine Activation patch developed by famous cracker known as Orbit30 on internet. PlusPatch V5 is available for both version of windows 7 32-bit and 64-bit.
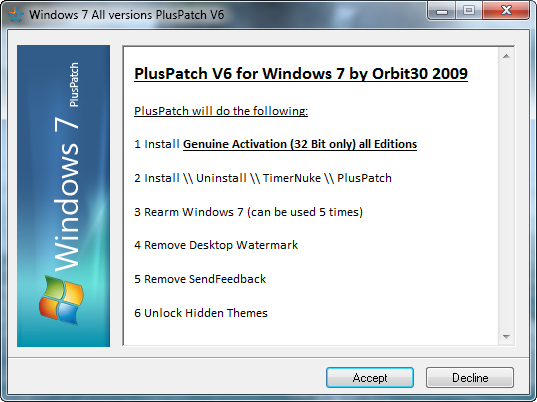
Today orbit30 has release PlusPatchV6 which is successor of PlusPatch V5, most of all features are same except one new feature to Enable hidden Windows 7 Themes. PlusPatch V6 is only for Windows 7 32 Bit version where PlusPatch for Windows 7 64-bit version is under development. This is last version of PlusPatch and there won’t be any new release of PlusPatch after Windows 7 64-bit version.

Guide of Activating Windows 7 Beta 1 using PlusPatch V6 by Orbit30

1. Download Pluspatch V6 Windows 7 beta 1 Activation Patch
2. Extract pluspatch.exe file from zip file
3. Right Click on exe file and chose run as administrator
Run As Administrator
PlusPatch V6 for Windows 7 Beta 1
4. Click Accept and Proceed for activation window
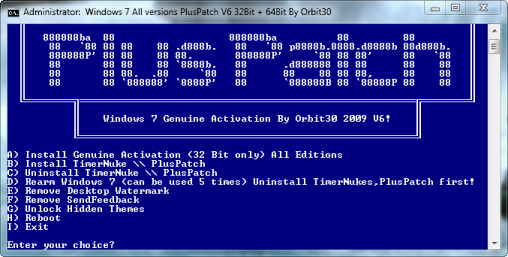
PlusPatch V6
5. Enter You Choice, Press A to Activate Windows 7.
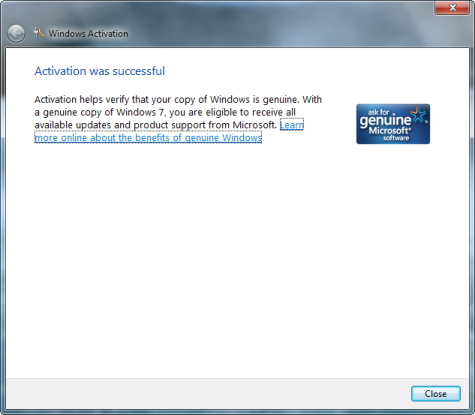
Windows 7 beta 1 Activation
Genuine Windows 7 beta 1